| Click here to return to my main Expedition Land Cruiser page Click here to return to my Toy Tech Home Page Click here to return to my Main Home Page |

| Copyright © 2007-2009 Brian McCamish, All Rights Reserved Note about the photos on this site: Most photos were taken by me. I usually allow people to use my photos for personal use or websites. Simply Email me. |
| Last Update: September 9, 2009 |
| Welcome to my Expedition Land Cruiser Exterior page. This page is linked from our main Expedition Land Cruiser Page, which is all about our new to us, 1995 Toyota Land Cruiser FZJ80 and our modifications to make it a capable vehicle for our local expeditions, travels and trips. The page covers all of our Exterior and Suspension area modifications. For other sections, see the below links. Our Expedition Land Cruiser Action photos page. Our Expedition Land Cruiser Interior page. Our Expedition Land Cruiser Engine page. Our Expedition Land Cruiser Gear page. Our article regarding how and why we bought a Land Cruiser. |
| Click here to return to my main Expedition Land Cruiser page Click here to return to my Toy Tech Home Page Click here to return to my Main Home Page |
| OVERVIEW |


| Rear bumper & Tire carrier There's no doubt the corners of the rear bumper would get pretty well trashed in the event it hit anything, since they are pretty weak, but what many may not realize is that the very rear center bumper of the LC80 is actually a solid cross member. Quite a beefy set up. But a full wrap around steel bumper would be much better. A number of companies make them and I'd like to eventually upgrade to one. The question comes in about whether or not to go with a swing out tire carrier option. Currently, the spare tire resides under the truck, where it hangs down very low. However with the lift and spare tire mod, whereby the spare is lifted up several inches, clearance is slightly better than stock. A rear tire carrier would still be much better. In addition, if I decide to go with an auxiliary gas tank, it would provide the needed room. There have been a number of occasions where the rear spare has gotten hung up, especially when backing up off road, so its current location is less than ideal. Rear auxiliary fuel tank. One thing I'm finding out is that the LC drinks gas. So much so, that a 25 gallon tank is not enough for some trips. My current contingency plan is to carry four 2.5 gallon steel wedco cans inside the Land Cruiser, but this is a less than ideal situation. See my Interior page for more details and pictures. The Land Cruiser 80 actually came with an optional 13 sub tank in some non-U.S. spec versions. That's one reason the spare tire is located so low, because the tank was located in the empty space above the spare. However, these tanks and the equipment needed to install them are very rare. Man-a-fre imports an Aussie tank that replaces the stock 25 gallon tank with a new 38 gallon tank, but I've heard less than stellar reviews about this tank, including low clearance issues and clearance issues with the drive line. Most people I've talked to, have installed a 44 gallon sub tank imported from Australia. Although I think these tanks are neat, I don't like the excess weight and reduced clearance. However, Man-a-fre does sell a 24 gallon version, which sounds interesting. However, so far, carrying Jerry Cans is the most cost effective and flexible option for carrying up to about 10 gallons and I'll probably stick with that for a while. So far it's worked fine, but I have to pay special attention to top off my fuel supply at literally every single oppertunity on a trip. ARB Snorkel I love the ARB snorkel and had a low profile snorkel on my truck. Not so much to keep the intake out of the water, because I rarely do deep water crossings, but to allow a fresh cold air intake. A snorkel can also help to reduce dust intake into the filter system as dust tends to hang lower in the air where the stock intake is located. Iron Pig Off Road Skidplate While I don't hardcore off road and I have a better than stock transfer case skidplate, I really like the Iron Pig Off Road skid plate design, which replaces the stock cross member with a lower profile skidplate that covers more area. I may never need it, but you can never have too much armor and protection for your vehicle, even for moderate off roading. |
| FUTURE MODIFICATIONS in order of priority (sort of) |
| When it was Stock |
| Here are a few pictures, when the Land Cruiser was nearly completely stock in the weeks and months after I purchased it. |
| EXTERIOR & SUSPENSION |


| Old Man Emu Suspension |
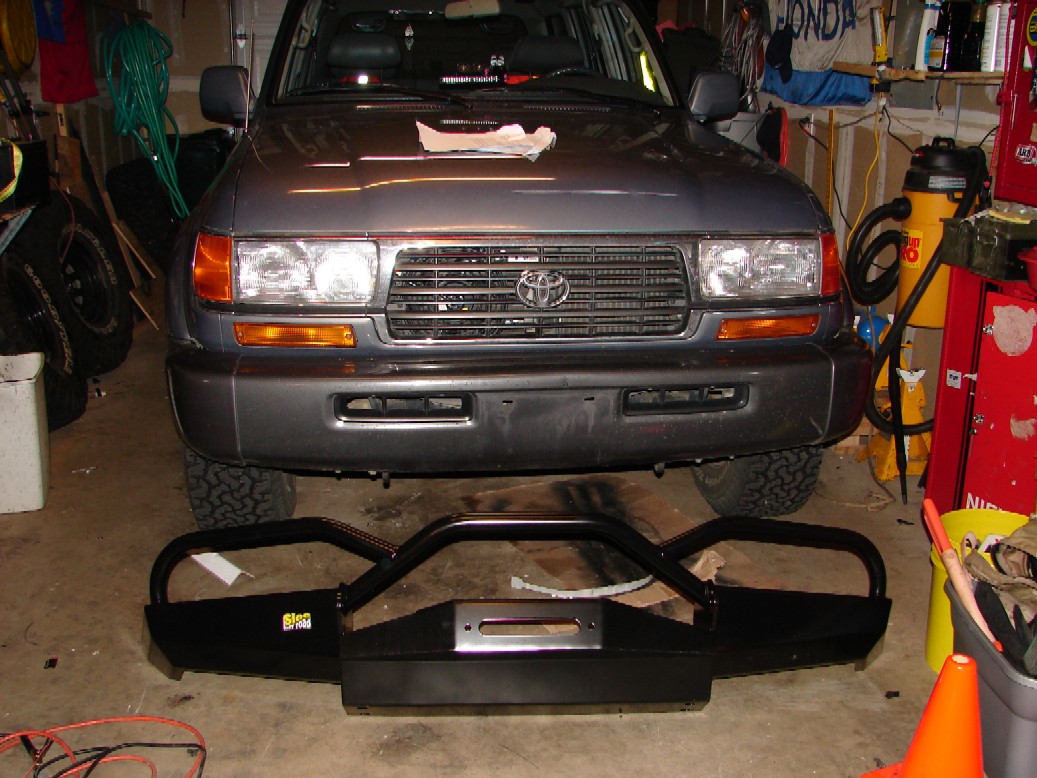
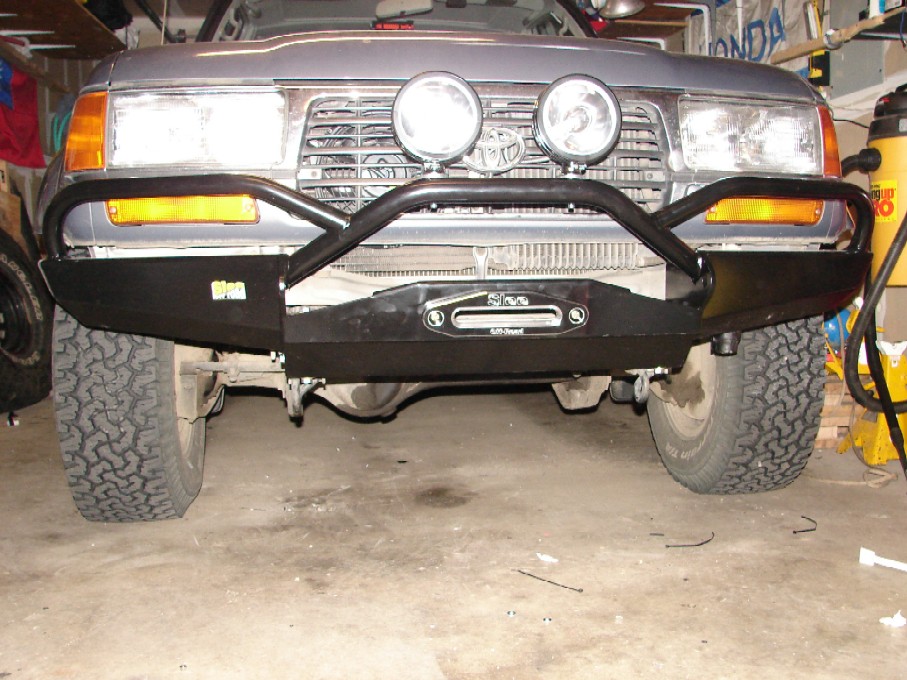
| The front winch bumper was one of the first modification we made. After much thought, between the new Slee "shortbus" bumper and typical ARB bumper, I decided to go with the Slee bumper. What appealed to me most about this bumper was that it was good looking and had a low profile, which went fairly well with our low profile build plans. It was also light and easy to install. One disadvantage compared to the ARB is that there is minimal protection to the grill and hood area, which could be a concern during a very large high speed animal strike. The Slee bumper is limited to an 8000-9500lb winch. To keep costs of this build relatively low, I decided to go with a new standard Warn M8000, and use synthetic cable. The decision to go with a less powerful but cheaper winch stems from the fact that we rarely winch and an 8000lb winch should be more than adequate for any situation we could run into, especially when double lined. The cable is 100 feet of 5/16th synthetic from Masterpull with a 16,500lb rated strength. I chose to upgrade to this cable on my truck due to it being much easier to handle, lighter and much safer. However, after snapping the synthetic cable, probably from a weak point in the line after several years of use, rather than spend the hundreds of dollars to replace the synthetic line, I'm currently running the original steel cable to save cost. . I also added a custom mount for the hi-lift jack which is also mounted on the front bumper. |
| Slee Off Road Bumper & Warn M8000 winch |
| The suspension was another source of concern. I knew that I wanted to upgrade the stock suspension, and that I wanted to go with ARB's OME line of springs, but I didn't know how high. After experiencing years of frustration with the truck and its too high of lift, I reverted to the opposite extreme and considered no lift at all with the Land Cruiser. The Land Cruiser's stock springs were sagging to the point of having about 1" less lift then stock, so new springs were definitely in order. I considered going with OME's stock lift springs (OME 861/862), which would have lifted the Land Cruiser less than 1" over stock, but provided a much better ride, both on and off road. Christo at Slee Off Road, talked me out of the stock lift and encouraged me to go with a 2.5" lift OME suspension. I was very apprehensive at the time, but now I couldn't be happier. I consider the 2.5" lift to be just perfect for our type of driving and off roading. Surprisingly, the additional lift is barely noticeable when driving as the factory anti-roll bars are left in place and the stiffer springs work great on the highway. Off road, the clearance is much appreciated. OME offers several different springs for a given lift height depending on weight. I decided to go with Heavy duty springs up front (OME 850), which maintained about 2.5" of lift, with the additional approximately 200lbs of bumper/winch/hi-lift on the nose. For the rear, Heavy duty springs were recommended, but I chose to use Medium springs (OME 860) instead, since my weight would not include a rear tire carrier and steel bumper. However I ordered both Medium and Heavy springs. The mediums went on the Land Cruiser and so far work perfect, but Heavies (OME 863) are in the garage for the day that weight is added and they are needed. Slee also supplied special bushings which were needed to correct the castor of the front suspension, when lifting more than an inch or so. A drive after the suspension lift, but before the install of the bushings, revealed why they are needed. The Land Cruiser wandered on the highway and felt unstable. Once the bushings were installed, it felt perfectly normal. Finally, OME shocks and steering stabilizer were installed. I don't recall noticing a significant difference between the stock shocks and the OMEs, but the OME steering stabilizer definitely made the steering feel heavier and more stable. |
| Wheels are stock aluminum 16x8. We chose to stick with stock for three reasons. They are the correct off set, they are about half the weight of steel wheels of similiar size and they are extremely strong. Much stronger than many after market wheels. The Toyota Land Cruiser wheels have to meet a Japanese standard of hitting a curb at approximately 40 mph with no loss in air pressure, and these wheels have been proven all over the world to be extremely durable. It's also cost effective not to have to buy new wheels. The tires are Goodyear MTR mud terrains, in 285/75R-16. I chose Goodyear MTRs, because I ran them on my truck with good success. Highway performance is excellent for a mud tire. They are not too noisy and perform good on both dry and wet pavement. They are an excellent off road tire in the dirt and perform adequately in the mud. They really shine in the snow and ice when siped. And finally, they are extremely durable. I never suffered a single flat tire in the 5 years I've run them. The drawback is that they are expensive and wear is not very good. They're probably worth about 30K miles at the most. However, for us, these tires will last us at least several years and performance is well worth the cost. If the Land Cruiser were a daily driver, I'd probably consider a different tire or at least a 2nd set of tires for normal use, such as the BFG A/T tires. All of that said, as these tires now approach more than half their life span, I dread the through of spending another thousand dollars on tires, so I would recommend at least looking at other options when selecting a tire on a regularly driven vehicle. I chose the 285/75R-16 size after much thought and debate. I knew that I wanted about a 33" tall tire. No less and not much taller to keep vehicle performance with stock gears as high as possible. 16" MTRs are only sold in a 33.1" size with 285s being about 11.4" wide, while 305s are a little over 12" wide. I chose the narrower tire for a number of reasons. It was more easily available, would be easier to replace, and would perform better on the highway. For most off road conditions, except where flotation is desired, I believe a narrower tire performs better. So far, I'm very happy with this tire size. |
| Stock wheels & Goodyear MTR mud terrain tires |
| I chose to do away with the factory running boards as they impeded ground clearance and can cause additional damage to the body when they get hung up on obstacles. However, this caused two problems. The running boards provided front mud flap protection and allowed easier access to the vehicle and once removed, that had to be fixed. C-Dan from the ih8mud.com board was able to supply me with a set of rare factory front mud flaps for Land Cruisers without running boards, but so far, I've yet to figure out what to do about the access into and out of the cab. However, these mud flaps had to be removed when the metal tech sliders were installed. |
| Front Mud flaps and -no- running boards |


| Stock front suspension. Unfortunately, I didn't take pictures while swapping out the stock springs for OME springs. But Slee Off Road's website covers the install pretty well. |


| Spare Tire Modification |
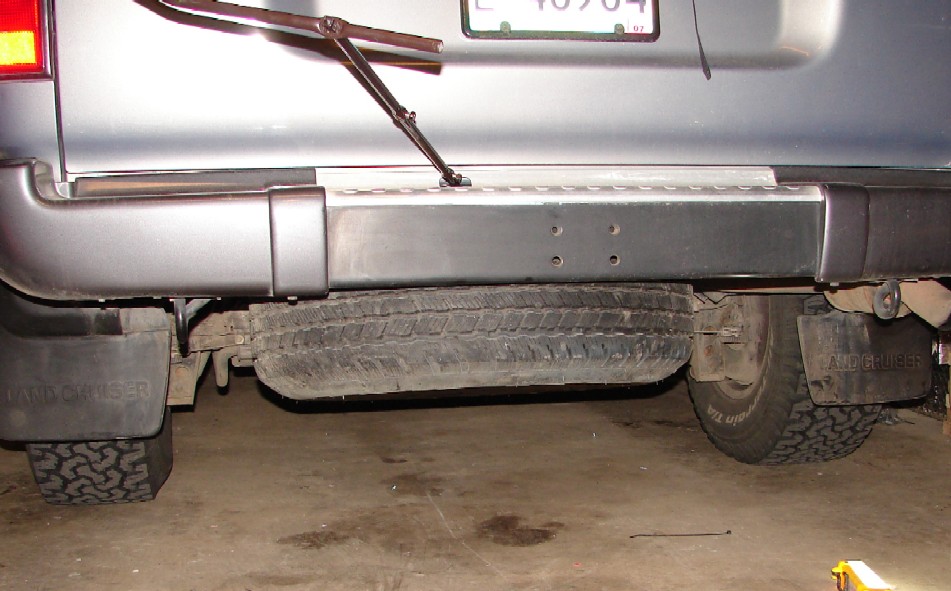


| The spare tire of the Land Cruiser resides under the cargo area, but unfortunately hangs down further that it otherwise should. The reason for this is because Toyota designed the Land Cruiser to be fitted with a 2nd auxiliary fuel tank located above the spare tire. However, this was never an option on U.S. spec Land Cruisers, but the spare tire still hangs low as if it was. The spare tire mod allows the spare tire to be moved up slightly to increase ground clearance. The mod is achieved by spacing up the spare tire crossmember with longer bolts and nuts or washers and spacing down the spare tire winch back to the stock location. This effectively moves the front of the spare up several inches. The rear of the spare does not move up very much because the rear crossmember is in the way. But this effectively levels the tire and still increases clearance towards the front of the spare tire. Left photo shows before the mod, while right photo shows after. I've since replaced the stock spare with a full size Goodyear MT/R in 285/75R-16 just like the other four tires, which can be seen in the far right photo. |
| Rear back up lights |
| After purchasing and installing LED interior lights, I found LED replacement tail and parking light bulbs and decided to test them out. These are from superbrightleds.com. The reasoning for going with LEDs for parking and taillights was to reduce the power used by these lights and allow me to leave them turned on for hours or even days at a time with no significant drain on the battery. Where this becomes useful is when parking at camp or trail head at night or when blocking a road. Leaving the parking lights on can serve a number of safety purposes when out in remote areas. In addition, I assumed that the 3 watt luxon taillights would actually be brighter and better than the stock bulbs. In fact, they were slightly better, although its hard to tell. In the photos on the left, the left taillight has the LED while the right taillight does not. Far left photo is just taillight while the next photo is the brake lights activated. The LED taillight uses about .065 amps. It would take a staggering 24 LED taillights to equal the power usage of a single LED taillight putting out the same or more light. I also swapped out and tested 3 watt LEDs for the back up lights, as you can in the two right photos. While the light looks nicer, it's not actually brighter than the 27 watt stock incandescent bulb, so LEDs were not used as back up lights. LEDs were also swapped in the front two marker lights and two rear side marker lights and license plate lights. These LEDs use an amazingly minimal .030 amps each. It would take 8 LEDs to equal the power usage of a single stock bulb. |
| LED parking and tail lights |


| I later added four auxiliary lights. The lower lights are "driving" style lens KC slim lights, and fitted with PIAA amber bulbs and used as fog lights. They are extremely effective. (as you can see) They are mounted low using the Slee bumper shackle tow tabs. The upper lights are custom fabricated HID lights. The stock tow hooks are still mounted on the frame so we still have front tow points. |
| Some early photos after the initial major modifications of suspension, tires and front winch bumper. |

| More recent exterior configuration - October, 2007 and January, 2008 |
| African Outback Roof rack |


| Some additional pictures showing all the front lights turned on at night. (current HIDs not shown) |

| An additional photo showing the rear LED tail lights and LED license plate lights. |


| The simplified version of the roof rack as it looks today and with little to no equipment stored on the roof during normal trips. |

| Back up lights have been modified and changed several times over the years. This is the current configuration. After destroying several sets of lights that were mounted on the bumper, I built a bracket that bolts to the license plate nuts that allows the lights to be mounted mid tailgate in a safer location. The lights are simple tractor lights with 100 watt bulbs. A high output LED light is mounted on the roof rack to act as both a 3rd back up light and a camp light. |
| While I do not hard core off road this Land Cruiser, it can see it's share of occasional obsticals and the FZJ80 has two large weak points. First are the exposed door sills and second are the low hanging and expose cat converters. Metal Tech Sliders work great to protect both of these. I chose Metal Tech because they are a local company to me, the design is extremely durable and I think the sliders are very good looking. The diamond plate mat on the rear slider bar is something I added to give foot traction when using the slider bar as a step to access roof gear. |
| Metal Tech Sliders |


| Prior configurations of back up lights. |
| Update: I found all of these LEDs to be reliable, except for the 1 watt LEDs I was using in the front marker lights. These would burn out and since they are very expensive, I later replaced them with incandensent bulbs again. The 3 watt taillight bulbs of similar design have lasted just fine so far. |
| The roof rack is an area of the truck's exterior that has undergone numerous changes over the last few years. We started out with an African Outback half roof rack. The overall design is awesome and it's a VERY fine built roof rack. However, I highly regret not getting the full size version. Were I to do it over again, I would definately spend the money for the larger rack. Today, the rack is used mainly to mount a shovel, pick axe, solar panels and a low profile tool box. The rack is also used to mount several amber strobe lights. The hieght of our garage door limits what can be carried on the rack, so the rack is designed to be used for very low profile storage. In the past, I've carried gear, spares, tools, and even fuel tanks on the rack. Today, a low profile ATV aluminum tool box is mounted, which just clears my garage door and inside that tool box is stored various digging tools for our historical research projects. Everything else is stored inside the vehicle. |

| Here are some prior roof rack configurations for reference. |
| Solar panels |
| Solar panels that were used on my old truck were reinstalled on the Land Cruiser. These solar panels are cheap consumer panels and are hardly worth the time to install. The maximum output of each of the two panels is 15 watts, for a total maximum output of 30 watts. In all likelihood, the panels probably don't even put out half of that at any given time. The panels are wired to charge the auxiliary battery, which powers things like the refrigerator and warning lights when the vehicle is turned off and parked as we are out hiking or exploring on foot. Eventually a better more efficent solar panel or panels will be added. |

| Transfer/transmission skid plate |
| The transmission and transfer case are somewhat exposed to damage when hardcore off roading. I don't hardcore off road, but I do travel over rough or abandoned mountain or desert roads and wanted at least some improved protection from the worthless stock skidplate. Land Cruisers NW built the original version of this skidplate, which was originally a flat piece of steel with cut outs for the drain plug. My Dad, later modified this skidplate with the step down you see here to better clear the transfer case. The skidplate is bolted to the main crossmember as well as the frame. It probably wouldn't support the weight of the vehicle, but would at least take the brunt of a major impact and keeps small trees and logs away from the transfer case. An iron pig off road full skidplate, cross member replacement, is a future potential modification to replace this skidplate and the main crossmember. |


